The psychology of resin casting is a masterclass in risk-reward calculation. Research from craft safety studies reveals that 68% of beginners report feeling intimidated by resin’s chemical warnings, yet only 23% consistently wear proper protective equipment . We crave the aesthetic outcome but resist the safety infrastructure that makes it possible.
This knowledge gap creates a dangerous paradox: the very activity meant to bring creative joy becomes a source of anxiety and potential harm. While we obsess over color mixing and mold choices, we devote almost no energy to the invisible architecture of fume management and skin protection. Understanding how to begin resin casting—learning to respect the chemicals while enjoying the process—transforms you from a fearful dabbler into a confident maker.
The Invisible Architecture: Why Resin Feels Overwhelming
Every resin project rests on a foundation of invisible chemical reactions. The transformation from liquid to solid isn’t magic—it’s polymerization, an exothermic process where molecules chain together, releasing heat and potentially harmful fumes. Understanding this invisible dance is the difference between success and a sticky, uncured mess.
Consider the simple mathematics of mixing. Most resins require a precise 1:1 or 2:1 ratio of Part A to Part B. A 5% error in measurement can result in a tacky, uncured casting that remains liquid for weeks . This precision demand triggers perfectionism paralysis. Yet the solution is simple: buy graduated mixing cups with measurement lines and use them religiously. The tool eliminates the cognitive load of math, freeing you to focus on creativity.
The materials of safety create similar invisible impacts. A workspace with proper ventilation isn’t just about avoiding headaches—it’s about creating psychological safety that allows you to relax into the process. A well-fitting respirator doesn’t just protect your lungs; it signals to your brain that you’re a serious maker, not a reckless experimenter. These choices ripple through your creative confidence, affecting not just outcomes but your willingness to continue.
The Resin Reaction: Mixing Math That Can’t Be Fudged
Ratio Precision: 1:1 or 2:1 (resin to hardener), measured by volume or weight
Mixing Time: 3-5 minutes of thorough stirring to ensure complete reaction
Working Time: 20-40 minutes before resin begins to gel (varies by brand)
Cure Time: 24-72 hours for full hardness, though touch-dry in 12-24 hours
The Safety Protocol: Protection That Doesn’t Kill the Vibe
Safety isn’t the enemy of creativity—it’s the foundation. Yet many beginners resist safety measures because they feel like barriers that slow down the “fun part.” The key is understanding that proper protection actually enhances creative flow by removing anxiety.
Ventilation: The Non-Negotiable
Make sure there is air circulating in your room. Open a window or use a fan if you can . Resin fumes contain volatile organic compounds (VOCs) that can cause headaches, dizziness, and allergic reactions. A well-ventilated space isn’t optional—it’s the minimum requirement. For frequent casters, a respirator with organic vapor cartridges is essential. An N95 mask is not suitable as a resin fumes mask . The investment in a proper respirator (around $40) pays dividends in creative confidence.
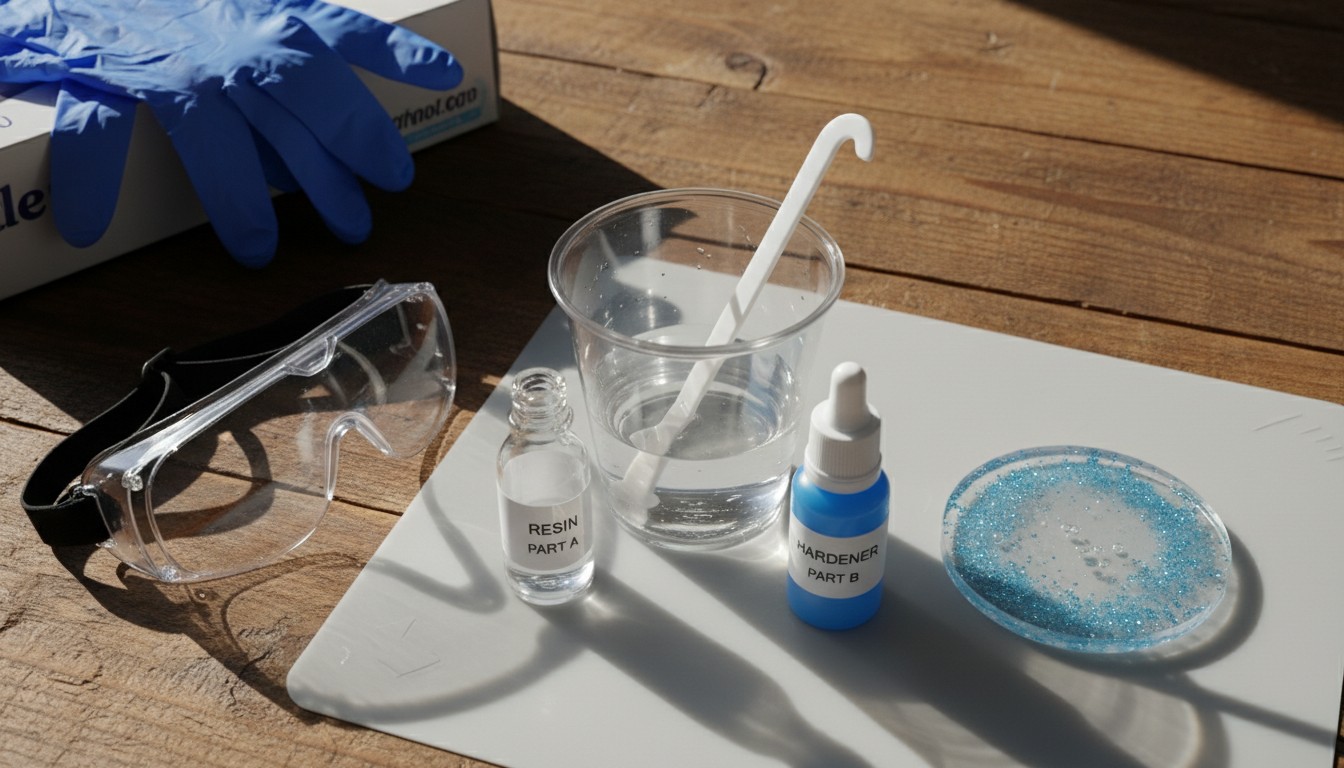
The Glove Game: Skin Protection
Always wear gloves to protect your skin from direct contact with resin, as it may cause irritation or allergic reactions . Nitrile gloves are superior to latex—they’re less likely to react with resin and provide better chemical resistance . For sensitive skin, apply a barrier cream before gloving. Keep a dedicated box of gloves next to your resin workspace so you never have the excuse “I’ll just mix this one quick batch without them.”
The Dedicated Tool Rule: Cross-Contamination Prevention
Once you use silicone baking molds with epoxy resin, you shouldn’t use them with food again . The same goes for mixing containers and utensils. Buy a separate set of measuring cups, stirring sticks, and spatulas and label them “RESIN ONLY” with permanent marker. This isn’t paranoia—it’s preventing microscopic chemical residue from entering your food chain.
The Safety Data Sheet: Your New Best Friend
Don’t use a resin that doesn’t have an SDS (Safety Data Sheet) . Your health isn’t worth the risk. The SDS tells you exactly what hazards you’re dealing with, whether you need a respirator, and what to do if you get resin in your eyes (flush with water for 15 minutes, seek medical attention). Print the SDS for your specific resin and keep it in your workspace. This isn’t overkill—it’s treating chemicals with the respect they deserve.
Clothing and Cleanup: The Aftermath
Resin can soak through clothing and irritate your skin. Resin drips will not come out of clothing. Or shoes. Especially your favorite shoes . Wear old clothes dedicated to crafting, or invest in a cheap lab coat. Keep isopropyl alcohol and paper towels nearby for immediate cleanup of spills. Cured resin can be sanded off surfaces; uncured resin must be wiped away before it hardens.
The Pre-Casting Safety Checklist
✓ Windows open and fan running for ventilation
✓ Nitrile gloves on hands, barrier cream applied if sensitive
✓ Respirator with organic vapor cartridges (for frequent casters) or at minimum, N95 mask
✓ Safety goggles if using power tools or sanding
✓ Old clothes dedicated to resin work
✓ Isopropyl alcohol and paper towels within arm’s reach for spills
The Tool Hierarchy: What You Actually Need vs. What’s Nice to Have
Resin crafting can be an equipment rabbit hole. The key is distinguishing between essential life-safety tools and optional convenience items that enhance the final product.
Tier 1: Non-Negotiable Safety & Basic Mixing
Nitrile gloves: Your first line of defense. Buy a box of 100—cost is about $10 . Never run out.
Graduated mixing cups: Precision matters. Cups with volume markings prevent ratio errors that cause uncured resin .
Stir sticks: Jumbo popsicle sticks are superior to regular ones—they’re sturdy enough for thick resin .
Silicone molds: Start with simple shapes (coasters, small trays). Silicone releases cured resin easily without mold release spray .
Respirator: NIOSH-approved for organic vapors. Not optional if you’re casting indoors more than once a month .
Tier 2: Quality Control & Finishing
Heat gun: Removes surface bubbles by heating trapped air. A $20 craft heat gun is sufficient; don’t use a hair dryer (too much airflow) .
Leveling surface: Resin self-levels. A slightly uneven surface creates pooling and thin spots. A small bubble level ensures perfect pours.
Sanding materials: Sandpapers (120 to 3000 grit) and polishing compounds for smoothing edges and achieving glass-like finishes .
Resin dyes/pigments: Start with liquid dyes—they mix more easily than powders for beginners.
Tier 3: Advanced Enhancement (Skip for Now)
Pressure pot: Eliminates all bubbles by compressing them to microscopic size. Expensive ($200+) and unnecessary for beginners .
UV resin: Cures in minutes under UV light, but is more expensive and better suited for small jewelry projects .
Drill mixer: For large batches. Overkill for small projects—hand stirring is actually better for controlling bubbles .
The Starter Kit: $50 Investment
Resin: EasyCast or similar epoxy resin for beginners ($20 for 16oz)
Gloves: Box of 100 nitrile gloves ($10)
Cups & Sticks: 20 graduated cups + 50 jumbo sticks ($8)
Molds: 2-3 basic silicone molds (coasters, small trays) ($12)
Total: $50 for your first 10-15 projects
The Project Progression: From Foolproof to Fearless
The key to skill-building is starting with projects that teach fundamental techniques without overwhelming complexity. Each project builds confidence for the next level.
Level 1: The Coaster—Your Gateway Cast
Small castings like coasters or fridge magnets are an excellent choice for beginners . These projects require shallow pours (under 1/4 inch), which means fewer bubbles and faster curing. Mix a small batch (2-3 oz total), add a drop of liquid dye, pour into a silicone coaster mold, and use a heat gun to pop surface bubbles. Let cure for 24 hours. Success rate: 95% if you measure accurately. The finished product is functional, giving you immediate satisfaction.
Level 2: The Keychain—Adding Embeds
Once you’ve mastered a clear pour, try embedding small objects. Pressed flowers, glitter, or tiny photos sealed with Mod Podge work well. The technique: pour a thin base layer, let it partially set (2-3 hours), position your embed, then pour the final layer. This prevents objects from floating to the surface. Keychains are small, portable, and make great gifts—motivation to practice.
Level 3: The Trinket Tray—Shallow Molds with Style
A small tray (4×6 inches) teaches you to work with slightly larger volumes and introduces the concept of decorative edges. Use painter’s tape to mask the back, creating a clean edge. This project also practices bubble management on a larger surface. The heat gun technique becomes crucial here: sweep quickly, 6 inches above the surface, to avoid creating ripples.
Level 4: The Pressed Flower Paperweight—Complex Embeds
Sealing dried flowers in resin requires patience. Flowers must be completely dry (use silica gel for 1 week) or they’ll discolor. The technique involves multiple thin pours: base layer, arrange flowers, intermediate pour to seal, final pour to level. This teaches you the rhythm of staged curing and demonstrates that resin casting is often a 2-3 day process, not a single session.
Level 5: The Glitter Tumbler—Introduction to Spinning
This project introduces the cup spinner—a device that rotates your tumbler while resin cures, creating an even coat without drips. It’s a gateway to more complex functional items and teaches you about resin viscosity. Fast-cast resins work better here than deep-pour formulas. The spinner costs $30-50 but opens up a world of practical, giftable items.
Level 6: The Faux Enamel Pin—Jewelry-Scale Precision
Shrink plastic designs coated in a thin layer of resin create professional-looking pins. This micro-scale work teaches you to work with small volumes and thin pours. Use a toothpick to guide resin into tiny crevices. The skill translates directly to jewelry making, where precision is everything.
Real-World Casters: Beginners Who Got It Right (and Wrong)
The abstract becomes concrete through examples. These case studies demonstrate how first projects can build or break confidence.
The Coaster Success Story
Megan, a 28-year-old teacher, started with coaster molds and alcohol inks. She measured meticulously, mixed for a full 5 minutes, and used a heat gun to pop bubbles. Her first set of four coasters cured perfectly. The immediate success gave her confidence to try embedding dried flowers. Within three months, she was making wedding favors for a friend. Her advice: “Start with the boring safety stuff. Once I knew I wasn’t poisoning myself, I could actually relax and create.”
The Paperweight Disaster (and Recovery)
Jake, a 35-year-old software engineer, skipped the safety gear for his first pour. He used fresh flowers (not dried) in a large paperweight mold. The moisture caused the flowers to rot, turning brown and mushy within the resin. The piece never cured properly, remaining tacky after a week. The fumes gave him a headache. Instead of quitting, he joined a Facebook resin group, learned about proper flower drying, and invested in a respirator. His second attempt—using silica-dried flowers and proper safety gear—was beautiful. “The failure taught me more than success would have,” he says.
The Keychain That Funded the Hobby
Ava started making resin keychains with pressed flowers from her garden. She posted them on Instagram and sold 20 in her first month at $15 each. That $300 funded her upgrade to a pressure pot and better molds. Within six months, she had a small Etsy shop. Her advantage: she treated it like a micro-business from day one, tracking costs and time. The financial return reinforced her practice habit, creating a positive feedback loop.
Practical Strategies: Your 30-Day Casting Blueprint
Understanding the theory is useless without action. Here is a concrete, four-week plan for transforming from resin-curious to resin-confident.
Week 1: The Safety Setup
Buy your safety gear and basic supplies. Designate a workspace—kitchen table is fine if well-ventilated. Read the SDS for your resin brand. Watch three tutorial videos, but don’t buy anything else yet. The goal is infrastructure, not action. This prevents the “gear acquisition syndrome” that kills more hobbies than failure does.
Week 2: The Test Pour
Mix and cast one single coaster. That’s it. No color, no embeds—just clear resin. Measure obsessively, mix for a full 5 minutes, heat-gun the bubbles. Document the process with photos. This simple pour teaches you the rhythm: measure, mix, pour, wait. The psychological victory of a perfect first cast is worth more than a dozen complex failures.
Week 3: The Color Experiment
Cast four coasters, each with a different color technique: one with liquid dye, one with mica powder, one with alcohol ink, one with glitter. This teaches you how different pigments behave. Some sink, some swirl, some suspend. You’ll discover your aesthetic preference while building skill. Label each coaster on the bottom with the technique used.
Week 4: The First Gift
Cast a project intended as a gift—a keychain for a friend, a coaster for your mom. The external purpose forces quality. Package it nicely. The positive feedback you receive will reinforce the hobby loop. Track your costs and time. If you spent $8 in materials and 2 hours, you’ve just created a $25 gift. That’s how hobbies justify themselves financially.
Resin Isn’t Magic—It’s Chemistry You Can Master
The glossy, glass-like objects you see online aren’t the result of innate talent or secret formulas—they’re the product of careful measurement, patient mixing, and respect for the process. Every failed pour teaches you something: too much hardener makes resin brittle, too little leaves it sticky, humidity slows cure time, temperature affects viscosity. These aren’t obstacles; they’re the curriculum.
Your power to create beautiful resin pieces doesn’t require an art degree or chemistry background. It requires one thing: treating safety as the first step, not an afterthought. The fumes will ventilate, the bubbles will pop, the resin will cure—all with or without your participation. But when you show up with gloves on, measurements precise, and workspace prepared, you transform from passive observer to active alchemist.
Start small. Mix one batch. Cast one coaster. Pop the bubbles. Let it cure. Your journey from intimidated beginner to confident caster begins with a single, well-protected pour—and where it leads is a world where you can preserve flowers in glass, suspend glitter in time, and turn ordinary objects into extraordinary keepsakes.
Key Takeaways
Safety is non-negotiable: ventilation, nitrile gloves, respirator for frequent casting, and protective clothing prevent both acute and chronic health issues .
Essential tools include graduated mixing cups, jumbo sticks, silicone molds, and a heat gun—total starter investment is approximately $50 .
Project progression should move from simple coasters (95% success rate) to keychains with embeds, trinket trays, and finally complex multi-pour items .
The 30-day blueprint builds habits: Week 1 safety setup, Week 2 test pour, Week 3 color experiments, Week 4 first gift project.
Resin casting rewards precision and patience; meticulous measurement and mixing matter more than artistic talent for beginner success.